Read Also
This technology article contains about how to install (re)install Windows 7 on a computer or laptop. When you buy a new laptop, sometimes the laptop has not installed the operating system or is still DOS.
Now to be able to use it, you need to install an operating system, such as the Windows 7 operating system.
As we know that Windows 7 is one of the most popular Windows operating systems today. Windows 7 itself was released to the public on October 22, 2009.
How to Install Windows 7 for Beginners
Although there are newer versions, namely Windows 8 and Windows 10, Windows 7 is still loved by many people. With a simple, lightweight, and easy-to-navigate interface, Windows 7 is still loved by many. The question is, what are the steps on how to install windows 7 for beginners?
I made this article to help friends who don't really understand how to install Windows 7 properly and correctly.
I wrote this article in the best possible way so that you can fully understand every step I explain. Before that, don't forget to prepare the following things before installing:
- "Prepare the Windows 7 DVD first, because we will learn how to install Windows 7 from DVDROM. If you don't have a Windows 7 Installer DVD, you can use a flash drive as an alternative. [Installation via flash can be checked here] / [Downloads Wndows 7]
- BIOS settings to boot from CD/DVD.
- Backup important data first. Data located on Local Disk C: such as the Documents, Downloads, Pictures and Videos folders.
- Did you install a laptop? If so, I recommend plugging in your laptop charger immediately. Do not let the laptop run out of power during the installation process because it will have a bad impact on the laptop itself".
#BIOS setup to boot from CD/DVD
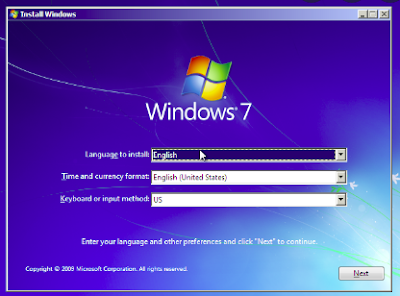
#Steps How to Install Windows 7
"For those who want to reinstall, downgrade or upgrade to Windows 7 at the same time don't want the data on other partitions to be lost, please skip steps 7-10. And for those of you who are installing Windows 7 for the first time, the HDD is still smooth and the Windows operating system has never been installed before, please skip step 6."
8). The next step is to partition the hard disk space. Select the Drive (advanced) > New option. Then specify the size of the partition/drive. Then select Apply when done.
9). Select OK for the creation of Windows system files or commonly referred to as the system reserved partition.
10). Please create 2 partitions in the same way as step number 7. Actually how many partitions depend on each taste. In this tutorial, I just created 2 partitions.
11). Please select Disk 0 Partition 2 as the windows installation location. Then select Next. Actually, you can choose the installation location anywhere, but I suggest you put it on Disk 0 Partition 2.
12). The Windows 7 installation process is in progress. This process takes approximately 20 minutes. During the process, the computer will reboot/restart by itself several times.
13). Don't press any key on the keyboard! This will cause you to repeat the installation process from scratch.
#. Giving the Computer Name and Setting Settings
1). The next step is to enter the user name and computer name. Then select Next.
2). The next step is to create a password for the Windows account. My advice, create a strong password with a combination of numbers and symbols. As for the password hint, enter a word or sentence that helps you remember your password. If you don't want to add a password, leave it blank. Then select Next.
3). Please enter the Windows 7 product key, then select Next. If you do not have a product key, you can skip the following steps without entering a product key. However, without activating the product key, you can only use Windows 7 during the trial period (30 days). Then select Next.
4). For Windows Update, please select Ask me later. You can select Use recommended settings if the Windows 7 DVD you have is genuine. But if not, I highly recommend choosing Ask me later.
5). Set Time zone / time zone.
6). The next step is to determine the network location. Please select Public Network.
7). If you add a password for your account as in step no. 14. You must first enter a password to enter the desktop screen. Then press the Enter key.
8). Yes! The Windows 7 installation process is complete.
Will the data be lost after reinstalling?
Not if you follow this guide properly. We first backup the data on partition C such as those in the Downloads folder, Documents, Pictures, Videos and others.
Can I do the installation via flash?
Of course you can, we can install Windows 7 using a DVDROM or flash.
Can this tutorial work in all versions of windows 7?
Yes, this tutorial can be applied in all versions such as windows 7 ultimate, professional, enterprise, home and starter.
What is the most basic difference between 32 bit and 64 bit windows?
Windows 32 bit can only read RAM with a maximum capacity of 3GB while Windows 64 bit can read RAM with a capacity of more than 4GB.
Can this tutorial be done on all laptop brands?
Of course, whatever your laptop brand such as asus, hp, lenovo, acer, dell, toshiba and others can all apply this tutorial.
What are the minimum specifications for windows 7 installation?
A laptop or computer with at least 1GHz CPU, 1GB RAM and 32GB storage media is enough to install Windows 7.
I hope you easily understand what I have explained in the tutorial above.


